Frequently Asked Questions
Please click on the links below to find answers to the most frequently asked questions about DiPS.
If there is a question you would like adding to this list please
e-mail
support@dips.co.uk
How to extend a DiPS Dongle in the Grace Period
In an expiry period the following message
will appear –
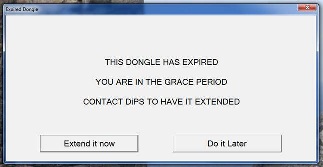
Choosing Do It Later will continue
into the program ..
Choosing Extend It Now will then
show The Access Rights screen -
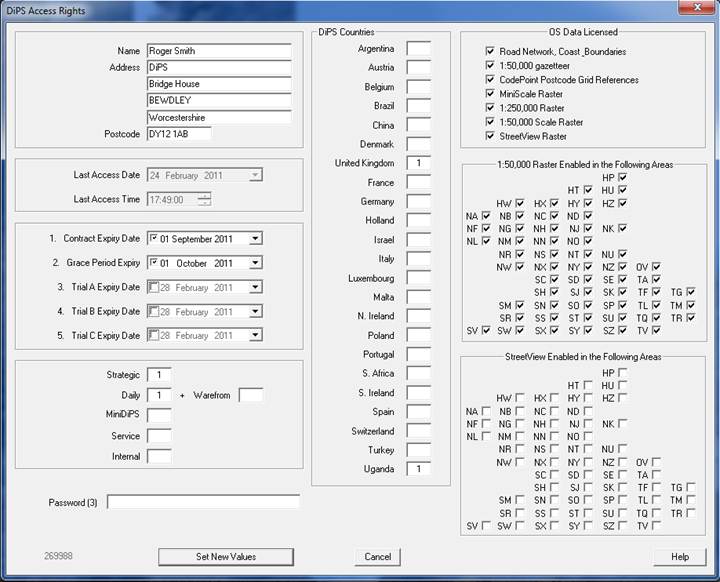
To set the dongles for the next period,
do the following:
Change the Contract Expiry Period to
be the date required (e.g. 1st September 2017)
Change the Grace Period Expiry to be
the date required
Enter the correct text as provided by DiPS
personnel in the Password (3) prompt.. (lower
case or capitals is not important)
Click on the Set New Values button
If successful, a message box with “Your
Dongle has been successfully Updated” will appear and the
program will then run as normal..
(Please note that it may take up to 30
seconds or so for this to appear)
Helpful Shortcut Keys
When looking through your routes in Egotrip mode:
Press F2 to go through routes with errors
Press F3 to quickly go to the next route
Press F4 to quickly go to the previous route
Press F9 to open the sysout file viewer
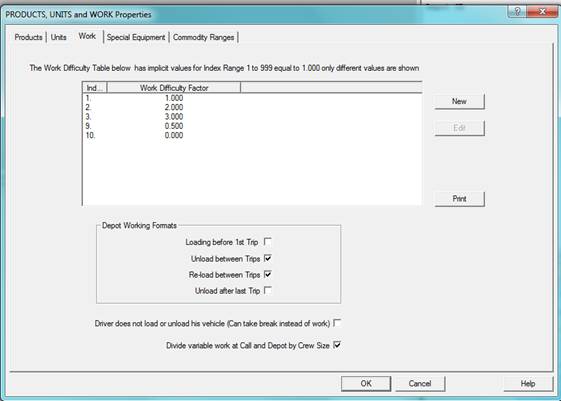
How DiPS Calculates Work Times
Work times are calculated based on Products or Units
or both; with a combination of other factors such as work
difficulty factors and extra time based on the Call, Vehicle and
Depot.
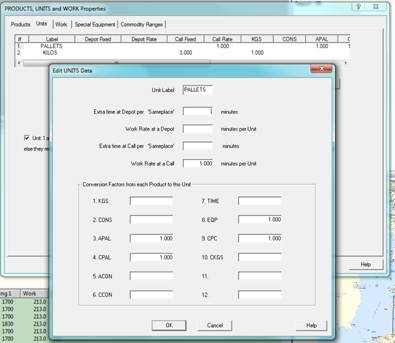
1. The main way is to set a Work rate based on the quantity of
units in an order ... Products loaded into Dips are converted
into a DiPS unit used for calculating the quantity that can fit
on the vehicles, etc. – e.g. converting products into Equivalent
Pallets.
Go to Edit -> products units and work – Click on the Units tab –
here you set the conversion factors for products into the unit
and can add a work rate per unit
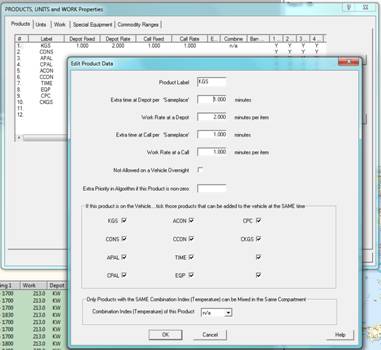
2. You can also set work rates based on the quantity of a
particular product
Edit -> Product units and work – Products tab
3. You can set work difficulty factors to use to factor the work
at certain calls or with specific vehicles – you set these up in
... Edit -> Product units and work – Work tab ... ready to
assign to calls later
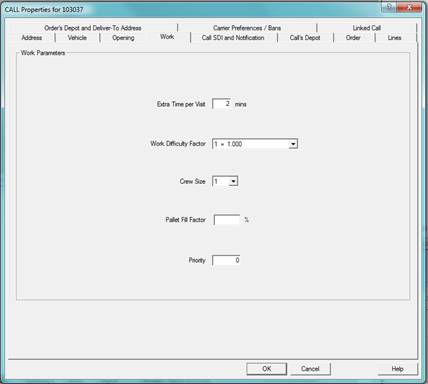
4. You can add extra time for specific calls as well as setting
difficulty factors for that call
Double click on a call to get the Call Properties -> Work tab
5. You can set up extra time and modify the work rate based
on the vehicle used
Edit -> vehicle classes -> double click a vehicle -> work tab

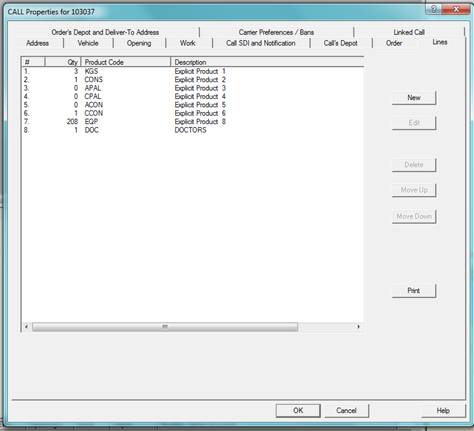
6. Finally the quantity of each product you have on an order
will drive the work time based on the parameters you have set
above
Call properties -> lines
Load Order Data from Spreadsheet
The File menu option Load Orders from
Excel Spreadsheet will process and input order information directly from an
Excel spreadsheet. This option is only available for specific report styles
defined in the File, Study, Settings dialog. The style ORDERXL can be used if
necessary as a short term measure. On running the option an initial dialog will
appear to select the spreadsheet to be loaded, followed by the page and options
dialog. Select the sheet or table to be used (default is always Sheet1) and then
tick the required options if necessary. Choose different delivery addresses if
orders have been defined that are to be delivered to another location rather
than that defined by the Call. Selecting rather of the Generate New options will
create system defined Order or Call numbers, meaning that the >*1 or >*2 columns
need not be defined or are ignored. Once data is loaded, click Apply to re-load
the model and. The preparation of the data must follow a few simple rules
1. Each new ORDER must occupy a
unique LINE in the spreadsheet.
2. The columns containing data to
be loaded must contain the correct labels as defined below in more detail.
Any column not containing this label will be ignored. In this way a selection of
columns may be used (e.g. columns A, C, D and F but not B or E).
3. The most left-hand '>...
labelled column must be the order ident. (NB This does not necessarily have to be
column 'A').
4. The data rows read from by DiPS
are defined by a pair of >> labels to the left of the
first and last rows of data. These labels cannot be placed in a column with
other valid DiPS data. The selected datarows should begin on line 2 – with the
headers being on line 1 of the spreadsheet.
>*1
Order Identifier (may be left justified text or a numeric value)
>*2
Call Identifier
(may be left justified text or a numeric value)
>*911
Order Tag Field
(up to 4 characters may be used)
>*9
Opening /Booked Time may be numeric or
time value (see below)
>*10
Closing Time
may be numeric or time value (see below)
>*11
Order Margin (value may be defined 2 to decimal places)
>*12
Order Linked Job (text field with the ident of an existing order to be routed next)
>*13
Skills Required (text field with Y or N flags for 1-32 skills e.g. YYYNNNY is skills 1,2,3,7
required)
>*912
Order Country
>*913
Special Delivery Instructions SDI Line 1 (80 characters text or up to 240 for
all 3 lines)
>*914
Special Delivery Instructions SDI Line 2 (up to 80 characters text for line 2
only)
>*915
Special Delivery Instructions SDI Line 3 (up to 80 characters text for line 3
only)
>*109
Due On Date (in format ddmmyyyy).
>*209
Due by Date (in format ddmmyyyy).
>*99 Order’s Pass Through Data
for display in user-defined columns
>D1
Force CALL to belong to the DEPOT named in this column
RESTRICTIONS Data
>R2
Call Opening Time 1 may be numeric or time format (hh:mm:ss)
>R3
Call Closing Time 1 may be numeric or time format (hh:mm:ss)
>R4
Call Opening Time 2 may be numeric or time format (hh:mm:ss)
>R5
Call Closing Time 2 may be numeric or time format (hh:mm:ss)
>R6
Day Restrictions
>R8
Extra Time per Visit
>R9
Work Difficulty Factor
>R10
Pallet Fill Factor
>R106
Nominated Days
>R107
Crew Size Required
>R108
Delivery Priority
>R7
Maximum Vehicle Class (MUST BE LEFT JUSTIFIED TEXT)
>R27 Maximum Vehicle Class
>R37
Side Loading Restrictions (L = left, R = right, F = front, T = tail or
appropriate combinations , e.g. L ,RT,LF)
>R47
Banned Vehicle Class 1 (doesn’t remove other banned classes)
>R57
Banned Vehicle Class 2 (doesn’t remove other banned classes)
>R67
Banned Vehicle Class 3 (doesn’t remove other banned classes)
>R77
Banned Vehicle Class 4 (doesn’t remove other banned classes)
>R11
Explicit Vehicle Class
ADDRESS Data
>A2
Grid Reference -
either a
Numeric EASTING (in which case >A3 is also required)
or an
Alphanumeric six digit
(1km accuracy) SU1234
or an
Alphanumeric eight digit (100m accuracy) SU120340
>A3
Numeric NORTHING (if >A2 is a numeric EASTING).
>A29
Numeric Easting for Ireland in UK projection
>A39
Numeric Northing for Ireland in UK projection
>A4
Name or Address Line 1
>A5
Address Line 2
>A6
Address Line 3
>A7
Postcode (automatically converts to Grid Reference)
>A8
Address Line 4
>A9
Address Line 5
>A11
Call Tag Field (up to 40 characters may be used)
>A12
Call Country (must be in a column before[ i.e. to the left of] any postcode
entry)
>A13
Special Delivery Instructions Line 1 (80 characters text or up to 240 for all 3
lines)
>A14
Special Delivery Instructions SDI Line 2 (up to 80 characters text for line 2
only)
>A15
Special Delivery Instructions SDI Line 3 (up to 80 characters text for line 3
only)
>A77
Call’s Postcode (only when used with Order Deliver-To Addresses option)
>A99 Call’s Pass Through Data for
display in user-defined columns
Totals for
Product Data or Commodity Range
^>AAA order quantity for product or commodity range
DiPS
recognises a Commodity Range header label because it must be centrally justified
using the carat symbol ^ . The next character must be the greater
than sign >. Finally the label contains the Commodity Range's name. As an example, for the
commodity range called FROZEN the demand quantity header would be
^>FROZEN. These commodity ranges or products must exist on the MASS file prior
to running the program.
Individual Values for Commodity Range Data
Using the ># label on the top of
a column allows multiple lines of quantity data to be loaded for each order. A
commodity range code is created using >#1 and then details for this commodity
loaded using subsequent ># columns. These commodity ranges do not have to
exist on the MASS file prior to running the program to load the orders. The last
row found for each commodity will be the quantity and conversions used. Rows
will not add together to produce a cumulative value for a single commodity.
>#1
Commodity Range Label (up to 20 characters text).
>#2
Commodity Description (up to 40 characters
text)
>#3
Primary Product Group No. (use numeric values of 1-12 to represent
products 1 to 12)
>#4
Primary Conversion factor (use numeric values up to 21,000 to
convert quantity into primary product)
>#5
Secondary Product Group No. (use numeric values of 1-12 to represent products 1 to 12)
>#6 Secondary Conversion
factor
(use numeric values up to 21,000 to convert quantity into second product)
>#7
Third Product Group No. (use numeric values of 1-12 to
represent products 1 to 12)
>#8
Third Conversion factor (use numeric values
up to 21,000 to convert quantity third product)
>#9
Quantity of this commodity (use numeric values to add a quantity of this
commodity)
Booked Times and Time Windows for
Orders and Calls
The >*9
flag may be used simply to define a single Booked Time for an Order using a
Numeric Value in 24hr format, such as 1000 for 10:00 hrs or 800 for 8:00 hrs.
For a Time Window, an 8 digit numeric value may be used giving from and to
times, i.e. 10001700 would give 10:00
to 17:00 hrs; or 8000900 for
08:00 to 09:00. The >*39 field can also be used to specify the Order
Closing Time window. Alternatively use the >R2 , >R3, >R4 and >R5 columns
to define opening and closing for the Call in separate columns
Other DiPS Headers to load from Spreadsheet
In terms of depots and calls the attributes correspond to header labels as follows :-
|
CALL Entity |
|
>C1 |
Call Identifier (up to 40
characters possible) |
|
>C2 |
Frequency (No. visits in Data
Collection Period) |
|
>C3 |
Cumulative Demand for PRODUCT 1
(negative if collections) |
|
>C4 |
Cumulative Demand for PRODUCT 2
(negative if collections) |
|
>C5 |
Cumulative Demand for PRODUCT 3
(negative if collections) |
|
>C6 |
Cumulative Demand for PRODUCT 4
(negative if collections) |
|
>C103 |
Cumulative Demand for PRODUCT 5
(negative if collections) |
|
>C104 |
Cumulative Demand for PRODUCT 6
(negative if collections) |
|
>C105 |
Cumulative Demand for PRODUCT 7
(negative if collections) |
|
>C106 |
Cumulative Demand for PRODUCT 8
(negative if collections) |
|
>C203 |
Cumulative Demand for PRODUCT 9
(negative if collections) |
|
>C204 |
Cumulative Demand for PRODUCT
10 (negative if collections) |
|
>C205 |
Cumulative Demand for PRODUCT
11 (negative if collections) |
|
>C206 |
Cumulative Demand for PRODUCT
12 (negative if collections) |
|
>C7 |
Total No. Drops in D.C.P. (not
required if same as >C2 ). |
|
>C8 |
Radius in Kms(only required if
>C7 is greater than >C2 i.e. pre-clustered) |
|
>C9 |
Enter
PAID
if Carriage Paid :
NO
to remove or set OFF (or Explicit Carrier Ident) |
|
>C10 |
Carrier does Collections (use
0=NO or
OFF, 1=YES
or SET ON) |
|
>C11 |
Call is never delivered by a
carrier (use 0=NO
or OFF, 1=YES
or SET ON) |
|
>C12 |
Call Margin value (up to 2
decimal places) |
|
>C15 |
Skills Required
text field with Y or N for 1-32 skills e.g. YYNNY
= skills 1,2,5) |
|
>C16 |
Next Linked Call Ident or use
NONE to
remove all linked data for this call |
|
>C40 |
Column header only will remove
all MASS file Call Products, Profiles or Multiple Data |
|
>D1 |
Force CALL to belong to this
DEPOT (>D1 must not be the 1st column) |
|
>C0 |
New Call Ident (changes the
existing ident to this new one, must follow in next
column to the right of >C1) |
|
ADDRESS Data for
Calls and Depots |
|
>A2 |
Grid Reference -
either a Numeric EASTING (in which case >A3 is
also required) or an Alphanumeric six digit (1km
accuracy) SU1234 or an Alphanumeric eight digit (100m
accuracy) SU120340 |
|
>A3 |
Numeric NORTHING (if >A2 is a
numeric EASTING). |
|
>A102 |
Numeric LONGITUDE (50.5 = 50
degrees 30 minutes) |
|
>A103 |
Numeric LATITUDE |
|
>A4 |
Name or Address Line 1 |
|
>A5 |
Address Line 2 |
|
>A6 |
Address Line 3 |
|
>A7 |
Postcode
(automatically converts to Grid Reference) |
|
>A8 |
Address Line 4 |
|
>A9 |
Address Line 5 |
|
>A11 |
Tag Field (up to 40 characters
may be used) |
|
>A12 |
Country (if used must be in a
column to the left of any postcode >A7 column to set the
relevant country) |
|
>A13 |
Special Delivery Instructions
Line 1 (80 characters text or up to 240 or all 3 lines) |
|
>A14 |
Special Delivery Instructions
SDI Line 2 (up to 80 characters text for line 2 only) |
|
>A15 |
Special Delivery Instructions
SDI Line 3 (up to 80 characters text for line 3 only) |
|
>A99 |
Pass Through Data for display
in user-defined columns |
|
>A17 |
Phone No. (or contact details)
– up to 24 characters of text may be entered. |
|
>A117 |
Pre Notification – value in
minutes |
|
>A217 |
Late or Post Notification –
value in minutes |
|
RESTRICTIONS Data
for Calls and Depots |
|
>R2 |
Opening Time - 1st Band |
|
>R3 |
Closing Time - 1st Band |
|
>R4 |
Opening Time - 2nd Band |
|
>R5 |
Closing Time - 2nd Band |
|
>R6 |
Day Restrictions |
|
>R8 |
Extra Time per Visit |
|
>R9 |
Work Difficulty Factor |
|
>R10 |
Pallet Fill Factor |
|
>R102 |
Booked Delivery Time in hhmm
format |
|
>R302 |
Booked Delivery Time Code in
text format (AM,PM etc.) |
|
>R106 |
Nominated Days |
|
>R107 |
Crew Size Required |
|
>R108 |
Delivery Priority |
|
>R203 |
Week No. of first Delivery |
|
>R7 |
Maximum Vehicle Class
(MUST BE LEFT JUSTIFIED TEXT) |
|
>R47 |
Banned Vehicle Class 1
(doesn’t remove other banned classes) |
|
>R57 |
Banned Vehicle Class 2
(doesn’t remove other banned classes) |
|
>R67 |
Banned Vehicle Class 3
(doesn’t remove other banned classes) |
|
>R77 |
Banned Vehicle Class 4
(doesn’t remove other banned classes) |
|
>R11 |
Explicit Vehicle Class |
|
>R37 |
Side Loading Restrictions (L = left, R = right, F = front, T = tail or
appropriate combinations , e.g. L ,RT,LF) |
| DEPOT Entity |
| >D1 |
Identifier (up to 10 characters
of text or numerics may be used) |
| >D0 |
New Depot Ident (changes the
existing ident to this new one, must follow in next
column to the right of >D1) |
| >A11 |
Tag Field |
| >D3 |
Maximum Daily Throughput of
PRODUCT 1 |
| >D4 |
Maximum Daily Throughput of
PRODUCT 2 |
| >D5 |
Maximum Daily Throughput of
PRODUCT 3 |
| >D6 |
Maximum Daily Throughput of
PRODUCT 4 |
| >D103 |
Maximum Daily Throughput of
PRODUCT 5 |
| >D104 |
Maximum Daily Throughput of
PRODUCT 6 |
| >D105 |
Maximum Daily Throughput of
PRODUCT 7 |
| >D106 |
Maximum Daily Throughput of
PRODUCT 8 |
| >D203 |
Maximum Daily Throughput of
PRODUCT 9 |
| >D204 |
Maximum Daily Throughput of
PRODUCT 10 |
| >D205 |
Maximum Daily Throughput of
PRODUCT 11 |
| >D206 |
Maximum Daily Throughput of
PRODUCT 12 |
|
Handling Costs & Product Costs (available to 5 decimal places) |
|
>D3H
Handling Cost for PRODUCT 1 |
>D3P Product Cost
of PRODUCT 1 |
|
>D4H
Handling Cost for PRODUCT 2 |
>D4P Product Cost
of PRODUCT 2 |
|
>D5H
Handling Cost for PRODUCT 3 |
>D5P Product Cost
of PRODUCT 3 |
|
>D6H
Handling Cost for PRODUCT 4 |
>D6P Product Cost
of PRODUCT 4 |
|
>D103H
Handling Cost for PRODUCT 5 |
>D103P Product
Cost of PRODUCT 5 |
|
>D104H
Handling Cost for PRODUCT 6 |
>D104P Product
Cost of PRODUCT 6 |
|
>D105H
Handling Cost for PRODUCT 7 |
>D105P Product
Cost of PRODUCT 7 |
|
>D106H
Handling Cost for PRODUCT 8 |
>D106P Product
Cost of PRODUCT 8 |
|
>D203H
Handling Cost for PRODUCT 9 |
>D203P Product
Cost of PRODUCT 9 |
|
>D204H
Handling Cost for PRODUCT 10 |
>D204P Product
Cost of PRODUCT 10 |
|
>D205H
Handling Cost for PRODUCT 11 |
>D205P Product
Cost of PRODUCT 11 |
|
>D206H
Handling Cost for PRODUCT 12 |
>D206P Product
Cost of PRODUCT 12 |
|
Loading Drivers from Spreadsheet |
|
>D1 |
Depot Name (must be the first column defined) |
|
>M1 |
Driver Identifier (Name) or Class Name (must be the
second column defined) |
|
>M2 |
No. Required (use 1 for an individual driver name) |
|
>M3 |
Can Drive up to Vehicle Category
(1-9 or 99)
99 = Mate (can’t drive a vehicle) |
|
>M4 |
Pay Scheme
(1-6) |
|
>M5 |
Start Depot Ident
(must already exist) |
|
>M105 |
Start Time
(default value applies to all days) |
|
>M205 |
Latest Start Time
(default value applies to all days) |
|
>M6 |
Finish Depot Ident
(must already exist) |
|
>M106 |
Finish Time
(default value applies to all days) |
|
>M7 |
Explicit Vehicle Id
(for individual drivers only) |
|
>M8 |
Explicit Trailer Id
(for individual drivers only) |
|
>M9 |
Explicit vehicle Class Wildcard |
|
>M10 |
Day Restrictions
(use 7 digit values with 0 and 3 for Sun-Sat) |
|
>M110 |
Night Out Banned
(Y for Yes or N for No) |
|
>M11 |
Driver Group
(1-4) |
|
>M12 |
Daily Limits – Maximum Shift Time |
|
>M13 |
Daily Limits – Maximum Overtime |
|
>M14 |
Daily Limits – Maximum Driving Time |
|
>M15 |
Daily Limits – Maximum Driving Distance |
|
>M16 |
Working Time Directive – Maximum No. of Days in DCP |
|
>M17 |
Working Time Directive – Maximum Shift Time in DCP |
|
>M18 |
Working Time Directive – Minimum Shift Time
remaining in DCP to start another day |
|
>M19 |
Working Time Directive – Maximum Cumulative Shift
over a number of Consecutive Days (see M20) |
|
>M20 |
Working Time Directive – No. of Consecutive Days for
Shift (see M19) |
|
>M118 |
Working Time Directive – Maximum Driving Time in DCP |
|
>M119 |
Working Time Directive – Maximum Cumulative Driving
Time over a number of Consecutive Days |
|
>M120 |
Working Time Directive – No. of Consecutive Days for
Driving (see M119) |
|
>M21 |
Driver Can Handle Products
(12 characters for the 12
products with Y or N ; e.g. YNYNYYYYYYYY) |
|
>M22 |
Driver Has Skills
(32 characters of text to represent the 32
possible skills with Y or N) |
|
>M116 |
Shift Pattern No. |
|
>M23 |
Explicit Mate No.1
(20 characters maximum)(drivers only) |
|
>M24 |
Explicit Mate No.2
(20 characters maximum)(drivers only) |
|
>M117 |
No of Lines in Shift Pattern |
|
>M216 |
Shift Pattern – Rota No. |
In addition to the default depots and times defined by >M5,
>M105, >M106, >M6 and >M106, different values for days of the
week may be input by adding an @”DAY” on the end of the column
header. Valid entries are @MON, @TUE, @WED, @THU, @FRI and @SAT.
Examples would include >M5@MON to change the Start Depot on a
Monday only, and >M106@WED to have a different Finish Time on
Wednesday
Loading
Vehicles from Spreadsheet
New field
types have been introduce to allow either vehicle class totals
or individual vehicle names (fleet nos. , registration nos. etc.)
to be loaded directly from an excel spreadsheet. Use the
>D1 depot identifier
as the first defined column and followed by the vehicle class
name preceded by
^> characters
(e.g. ^>ARTC ,
^>40FT or ^>R1). On each depot row individual names may be
entered by typing the required text (e.g. VU05 XXX or TR0050),
whilst class totals can be entered by using the required number
preceded by a # sign
(e.g. #20 for twenty, and #0 to set at zero or delete all
vehicles of this class at this depot).
|
|
>D1
|
^>ARTC
|
^>40FT
|
^>7.5T
|
^>7.5T
|
|
>>
|
DEP
|
ARTC1
|
40FT1
|
|
|
|
DEP
|
ARTC2
|
40FT2
|
|
|
|
DEP
|
|
|
|
#20
|
|
SAT
|
#0
|
40FTG2
|
7.5TG2
|
7.5TG21
|
|
>>
|
SAT
|
|
40FTG3
|
7.5TG3
|
7.5TG22
|
| Loading
Working Routes |
|
>W1 |
Relative Route Number |
|
>W2 |
Day Name (Sun,Mon,Tue,Wed,Thu,Fri,Sat) |
|
>W12 |
Week Number of Route (only if planning period is
more than 7days) |
|
>W3 |
Route Date (only if Daily Scheduling with Orders) |
|
>W4 |
Route Length in days |
|
>W14 |
Earliest Route Departure Time (in hhmm) |
|
>W24 |
Explicit Gate Departure Time for a Trip (in hhmm) |
|
>W5 |
Ident of Depot or Call |
|
>W15 |
Order or Shipment Ident (if Daily Scheduling) |
|
>W25 |
Quantity in Vehicle Unit1 (if Strategic) |
|
>D1 |
Owning Depot of Route |
|
>W6 |
Vehicle Ident |
|
>W7 |
Trailer Ident |
|
>W10 |
Driver’s Name |
|
>W8 |
Slot or Window Number for Call |
|
>W9 |
Product Group (1-12) in this slot (only required if
split by product or multiple) |
|
>W18 |
Call’s Profile Day No. (1-7 Sun-Sat) or
start day for a depot’s trip if defined on a depot line |
|
>W35 |
Call’s Profile Day Name (SUN, MON, TUE, WED, THU,
FRI, SAT) |
| Loading
Fixed routes |
|
>F1 |
Relative Route Number |
|
>F2 |
Day Name (Sun,Mon,Tue,Wed,Thu,Fri,Sat) |
|
>F22 |
Nominated Days (using 7digit 0111110 format) |
|
>F4 |
Route Length in days |
|
>F14 |
Departure Time (in hhmm) |
|
>F5 |
Ident of Depot or Call |
|
>F15 |
Dummy Shipment Ident (if Daily Scheduling) |
|
>D1 |
Owning Depot of Route |
|
>F6 |
Vehicle Ident |
|
>F7 |
Trailer Ident |
|
>F10 |
Driver’s Name |
|
>F8 |
Slot or Window Number for Call |
|
>F9 |
Product Group (1-12) in this slot (only required if
split by product or multiple) |
|
>F18 |
Call’s Profile Day No. (1-7 Sun-Sat) or
start day for a depot’s trip if defined on a depot line |
For more headers, detailed information and instructions please
see the DiPS user manual (pg.69)
Stop Windows Security Warning
after downloading new version
After you have downloaded and copied the new version of M3 into
your DiPS/Win folder, you may find when you come to run DiPS you
will see a Windows Security Warning:
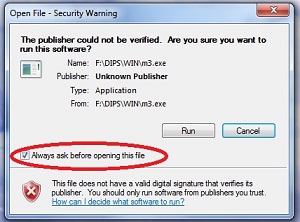
To stop it reappearing, untick the box next to "Always ask
before opening this file" then click Run. The next time you run
DiPS the warning will not show.
If your DiPS dongle needs to be returned to DiPS for repair, replacement, upgrade, etc.
Please send to:
DiPS
Bridge House
Bewdley
Worcestershire
DY12 1AB
*Please Note*:
You are required to send it
via Royal Mail Special Delivery or courier
to ensure it is signed for at both ends.