Data Preparation
Prepare Spreadsheet for use in DiPS, Set column header flags for loading
data (see below)
Start Study, Kingpin Mode for Data entry
Use File, Study, New Study option to create a brand new study (if
required) or use File, Retrieve for an old base study
Add or amend basic default information (depots, vehicle types, opening
times)
Use the Edit menu to setup Products & Vehicles, Use Kingpin Mode to add
more depots & change depot parameters
Load in call data from spreadsheets with the File, Study menu option.
Verify address data after loading spreadsheet in Highway mode
Use Kingpin mode to change call data after loading
Travel Menu option to set road speeds and calculate travel times
& distances
Set road speeds in Travel, Parameters, Run Matrix option to calculate
times and distances between calls and depots
Set or alter the Depot Boundaries in Warefrom
Display depot areas (the “ASIS” situation), Verifying any data mistakes,
Checking depot throughputs
Move calls manually between depots using text panels or using graphics
(draw area)
Routes Menu to create Routes
Set Basic Routing Parameters (shift times, breaks, limits, vehicles at
depots)
Use Algorithm Keys to prioritise calls, Scales Macro to define route
shapes
Use Algorithm Passes to create required routing patterns - Routing by
depot (out-bases)
Use Vanguard to schedule vehicles from depots or Sharevan to use vehicles
between depots
Manually alter routes in Egotrip Mode by dragging calls onto or off
routes
Final Report Process
Use File, Print menu, Screen Export routines, or Custom Reports to
produce output information
Export detailed route Information directly into Microsoft Excel using
Routes, Export to database menu option
Spreadsheet - Strategic Data Headings for Calls
|
CALL Data
>C1 Call Identifier (must be unique).
>C2 Frequency (No. visits in study period (DCP))
>C3 Cumulative Demand for PRODUCT 1 (negative if
collections)
>C4 Cumulative Demand for PRODUCT 2 (negative if
collections)
>C5 Cumulative Demand for PRODUCT 3 (negative if
collections)
>C6 Cumulative Demand for PRODUCT 4 (negative if
collections)
>C103 Cumulative Demand for PRODUCT 5 (negative if
collections)
>C104 Cumulative Demand for PRODUCT 6 (negative if
collections)
>C105 Cumulative Demand for PRODUCT 7 (negative if
collections)
>C106 Cumulative Demand for PRODUCT 8 (negative if
collections)
>C203 Cumulative Demand for PRODUCT 9 (negative if
collections)
>C204 Cumulative Demand for PRODUCT 10 (negative if
collections)
>C205 Cumulative Demand for PRODUCT 11 (negative if
collections)
>C206 Cumulative Demand for PRODUCT 12 (negative if
collections)
>C12 Call Margin value (up to 2 decimal places)
>D1 Force CALL to belong to this DEPOT (>D1 must not
be the 1st column read).
|
|
ADDRESS Data
>A4 Name or Address Line 1
>A5 Address Line 2
>A6 Address Line 3
>A8 Address Line 4
>A9 Address Line 5
>A7 Postcode
>A11
Tag Field
>A13 Special Delivery Instructions Line 1
>A14 Special Delivery Instructions Line 2
>A15 Special Delivery Instructions Line 3
|
RESTRICTIONS Data
>R2 Opening Time - 1st Band
>R3 Closing Time - 1st Band
>R4 Opening Time - 2nd Band
>R5
Closing Time - 2nd Band
>R6
Day Restrictions
>R106 Nominated Days
>R8 Extra Time per Visit
>R9 Work Difficulty Factor
>R102 Booked Delivery Time
>R203 Week No. of first Delivery
>R107 Crew Size Required
>R7 Maximum Vehicle Class
>R11 Explicit Vehicle Class
|
-
Run DiPS New Egotrip program,
enter UserId and Password
-
Click OK at backup prompt –
(you will see yesterday’s routes)
-
To delete all of yesterday’s work click File,
then Delete Entities:
·
From the Item Type option,
select ORDER
·
Set
Delete ALL above items subject to
date field below
·
Click
OK
·
This will delete all old
calls and routes
·
A message will appear
saying all Routes have been deleted – You are in Strategic Mode - Click
OK
-
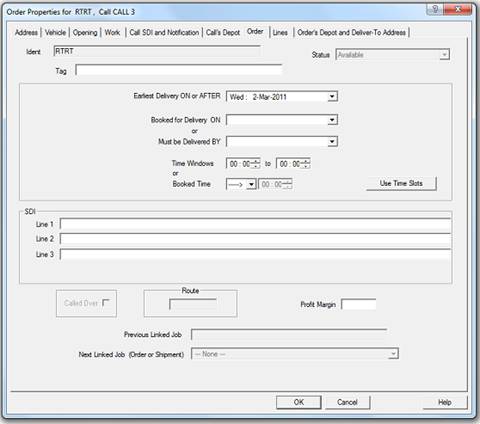
Input any manual orders that you need. To do this click
Edit, Kingpin Mode, then click on the Orders tab
·
To create a new Order,
click the right hand mouse button and then New, type the appropriate order
and call id into the fields provided and then click on the OK button.
·
Set the delivery date and
any time windows as required
·
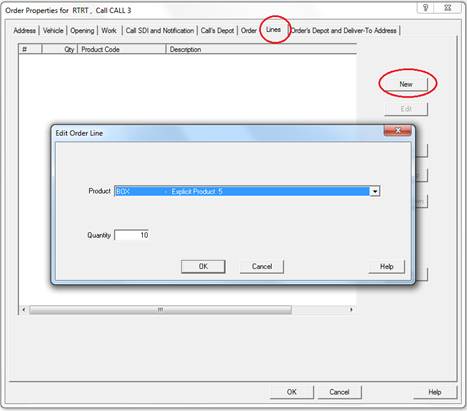
To input the quantities,
click on the Lines Tab. Click New to select the product (e.g. CUBE and CASE)
and add the quantity required
-
To load the orders click File,
Load Orders…….. Select the file as necessary and other sheets as
required.
-
When orders are loaded, the Matrix will run automatically.
·
When this has finished
check the text panels for depots & calls without grid references.
·
If there are any, double
click on each in turn and enter the correct postcode.
·
Then click
Travel, Run Matrix, and GO at the dialog to calculate times/distances for the extra calls.
-
To move calls into their correct delivery depot, click
Warefrom, Execute Postcode to depot table and then OK at the
confirmation message. The depot areas will be shown by different colours
on the graphics picture. If there are any calls you need to move, click
the right hand button in the top panel and from the Set Depot menu pick
the depot required. This will display all the calls at that depot.
Repeat the process in the other panel and then use the left hand button
to select and right hand button to drag to the new depot.
-
To show orders, click Routes,
Egotrip mode - All un-routed orders appear in the green panel
(bottom left).
-
To Route Orders onto Vehicles
·
Click Routes,
Run Dayplan and then Go
at the Run Options dialog. Routes will then be created and the program will
re-load showing all the routes and any un-routed orders in the bottom green
text panel.
·
For menu options on
routes, click the right hand button anywhere in the 2 text panels.
·
For a new blank route,
from the menu select, Vehicle Route ,
depot , date , and then click
New
·
Drag orders from deferred
list at bottom onto routes. Click on any of the columns headers with the
left hand button to sort this list (e.g. by postcode)
·
Drag orders using left hand button to select and right hand button to drag.
You can move Orders in a route using the same method.
·
To remove an order from a
route, drag orders into green panel of un-routed orders. It is added at the
top of the list.
·
To display existing routes
click on Route Summary tab in
Output panel (top right), and then click once on a route to display in top
panel (twice for middle panel)
·
To display a route
graphically from the menu, click
Popup Graphic
·
To change the vehicle for
another, use the Change Vehicle
option and then the type of vehicle.
·
To create a carrier list
for parcels delivery, from the menu select Carrier List
·
To print the routes at any
time, click File, Print and from
the menu options choose Traffic
Sheet.
·
To print un-routed orders, click right hand button in green panel and select
screen print, all lines
·
To re-sequence a route
choose Optimise a route option
·
To print the routes at any
time, click File, Print and from
the menu options choose Traffic
Sheet. (Choose Route Summary for the summary section if required)
·
To print un-routed orders, click right hand button in green panel and select
screen print, all lines
·
Once you have finished
routing, to create the routes upload file, click
File, Send Routes back to……..